Yamaha TX816 Emulation

The video is a work in progress of my DIY Yamaha TX816 using 4 microdexed modules.   I created a small circuit board that made it easier to navigate and use the microdexed module.  Using a ZIF socket for the Teensy microcontroller made it easier to swap out modules for “programming”.  By programming, I mean set the default bank, volume, midi channel, etc.   With MicroDexed, there is no FM programming interface available via the knobs and LCD

   I soldered together 4 Teensy MicroDexed modules, put it in a box and made a DIY TX816.  The first rendition had no LCDs or knobs.  Although I could play it via MIDI, there were a few problems.  It had some ground “hum” and since there was no LCD, it made for a boring video demonstration.  There were no LEDs or anything that gave the viewer an idea that the module was actually producing sound.   If anyone is interested in the schematic of the above board, below is my handwritten schematic.  Note, the LCD is the one I sourced here locally so it was not compatible with the LCD drivers that come with MicroDexed and had to be rewritten.    Your mileage may vary depending on the LCD module you use.

MicroDexed on Teensy4.0

MicroDexed on Teensy4.0

After my last post about Dexed on the Teensy, I got an email telling me about MicroDexed.

https://codeberg.org/dcoredump/MicroDexed

https://codeberg.org/dcoredump/MicroDexed/wiki/?action=_pages

These makers have already ported Dexed to the Teensy 4.0 and added a nice LCD based GUI to the software.  They even have a custom PCB and a manual on how to build it.  But I couldn’t find a schematic in their documentation.  Undeterred, I read through the source code and reverse engineered the hardware based on the build manual and software source code. I already had most of the necessary parts so I ordered a Teensy 4.x audio shield and was able to get a working version of MicroDexed.   I am impressed with the results, much better than what I have been able to acheive.  Hats off to the folks at Parasitstudio.

There are a few caveats, that I’d like to share in case you want to take on this challenge yourself.

  • My i2C LCD display was not compatible with the 3rd party LCD library that was provided so I rewrote the LCD library.
  • The Code assumes you have a Teensy 3.x Audio board.  The pins used to control the audio board are different between version 3.x and 4.x.   I struggled with this for a while because the rotary encoder uses digital pin 8 which will collide with the Teensy 4.x audio board.  It works fine with the Teensy 3.x audio board but you will have to remap it for the Teensy 4.x audio shield.  I just used pin 9. 
  • There is quite a bit of latency due to the animated LCD display.  In the video, you can see that when I disable the LCD display, the MIDI latency goes away.   However, the code out of the box does not compile if ENABLE_LCD_UI is disabled.   I had to expand the conditional compile directives to get the code to compile without errors. 

A lot of information is available in the documentation and most of the important bits of code is in config.h.  

The Cost:

When I first started out porting Dexed to the Raspberry Pi Pico, my goal was to attempt to create a DX clone for under $10.   Although the Pico was only $5, all of the other parts pushed the BOM costs closer to $20 and I was ultimately only able to get 2 voice polyphony out of the prototype.  

A Teensy 4.0 and 4.x audio shield will set you back about $35.   Of course, like the Pico, you’ll need some power circuitry, an LCD, a couple rotary encoders, MIDI/Audio connectors and a case which will add to the cost.   But MicroDexed is able to run 2 Dexed instances that each have 32 voice polyphony according to the source code.  I have not confirmed the max polyphony, by the way.   So if we allocate $20 for the rest of the circuitry, we could have 2 DX clones for a little over $50!   If we consolidate 4 Teensy into a single project then it is conceivable to have TX816 clone for under $200!  

What’s next:

As I only got the prototype working recently, I still need to play with the MicroDexed to look into all of the features.  The MIDI implementation looks quite comprehensive.   Given the success with MicroDexed on the Teensy, I may consolidate several to build a TX816 clone as well as connect it to the sequencer.


Yamaha DX7 Clone on Teensy 4.0

More Polyphony, slightly better sound.


I ported DEXED to both the ESP32 processor and TEENSY4.0 MCU + Audio Shield. Pictured is the Teensy4.0 + audio shield and a 128×32 OLED display to display the patch name.

With the Teensy4.0 I have been able to confirm at least 10 voice polyphony! However, there is a slight “glitchiness” to the sound which is more pronounced depending on the patch.  You can really hear it in the YouTube video, especially the E.Organ1 patch! I think it is mostly software based because it is virtually non-existent on some of the other patches.  


What about the ESP32?

I couldn’t get the ESP32 board to quite work but the problems can be overcome.  One issue is that the ESP32 software development environment is built around a RTOS. It does not appear that one can develop an application in a “bare metal” or near “bare metal” mode like the Raspberry Pi Pico. As a side note, the Raspberry Pi Pico supports both a “bare metal” environment as well as a Arduino centric library.  The ESP32 RTOS assumes your process will yield to a watchdog process and this yielding and task switching will take approximately 10 milliseconds. Well, 10 milliseconds in real-time audio is forever and causes big glitches in the sound generation. I was able to get around that by using a suggestion in some forums to set the task priority to the taskIDLE priority

xTaskCreate(someFunction, “HumanReadableNameofTask”, 4096, NULL, tskIDLE_PRIORITY, NULL)


The ESP32 restriction of working in the confines of an RTOS was an unexpected hurdle in porting DEXED.  But ultimately I couldn’t get DEXED to run on the ESP32 because the DAC I have doesn’t work well with the DMA of the ESP32. I’ll have to look into a different DAC to fix that.  That will be a separate project.  

As an aside,  the Teensy audio library only works in the Arduino environment.  The Pi Pico can work either in a “bare metal” environment mode or Arduino environment. The ESP32 only works within its RTOS environment.


Cost

When I first worked on getting DEXED to run on the Pico Pi, my objective was to try and get a really cheap DX7 clone running.  Since the Pico Pi is only a $5 MCU, just adding a cheap DAC seemed like I could get a DX7 clone for under $10.  But I could ultimately on get 2 voice polyphony out of it.  I pursued the ESP32 MCU as it is only about a $8 MCU but, as I mentioned, I couldn’t quite get it to work.  Which brings me to the TEENSY4.0 board.  This board list for $20 USD but since I don’t live in the US, it ends up costing me more around $25 locally.  But for that amount of money, getting 10 voice polyphony out of the Teensy makes sense. The processor is board is 5 times cost of the Pico Pi which could only generate 2 voice polyphony so getting 5x polyphony would be expected to make sense from a cost perspective.  The Teensy audio daughter board lists for about $14 and is more expensive than my home brew DAC I built for the Pico Pi but given that it just “worked out of the box” and I didn’t have to fiddle with any clocks or software to get the precise sampling rates was well worth the cost.  The Pico Pi prototype had some noise issues and given that I am convinced that the noise issues on the Teensy are likely all software based, I think it’s well worth the cost. 

But given the cost of the Teensy and daughter board, it might make more sense to just run DEXED on a raspberry pi. But then there is no fun in that as it would just likely work. There would be no porting work involved and that’s a lot of the fun! 

Raspberry Pi Pico – DX7 clone

Building the MIDI sequencer with the Raspberry Pi Pico was a great learning experience and a chance to learn the details and features of the Pico microcontroller. 

I thought it would really cool to combine the sequencer with a sound source other than my Reface DX or other MIDI synths, so I embarked on building a Pico based synthesizer.   After searching for different ideas, I found a few open source software emulations of the fabled DX7.  One in particular that caught my eye was a program called DEXED.  It is open source and written in C/C++ which made it an attractive candidate to attempt a port to the Pico.  I had no idea if the Pico would be fast enough to run the software but decided build a prototype and give it a try.

So with a minimal number of parts, the Pico Pi, a 12 bit DAC, a MIDI in circuit, a 2-digit 7segment LED and BCD driver, a active low pass filter, I built the circuit and proceeded to port DEXED to the Pico.  The point of this project was to see if Pico could run DEXED.  I wasn’t too worried about sound quality as long as it was “good enough”.   

Well, to my surprise, I was able to get it to work.  In fact, I ported the original DX7 ROM into the code and am able to confirm that it indeed sounds like the original DX7!   I guess it would be more accurate to call what I created a TF1 clone (one of the modules in the TX816), since the DX7 has a keyboard, touch panel, etc and the TX7 also has and LCD screen with some buttons.  The 7segment LED and BCD driver isn’t necessary to make the prototype function correctly but it made it easier to figure out which patch was selected.

However, the prototype isn’t without problems.  First, it’s really noisy.  It has a low pass filter, but it has a lot of noise and hum.  This has a lot to do with the cheap DAC I chose as well as the fact I used the same power source for both digital and analog power references!  Of course, this can be remedied with a better design and additional parts but my goal was just to see if the Pico could run a port of DEXED.  I figure I can work on cleaning up the audio quality later once I proved that microcontroller could run DEXED.  

But the other limitation and probably the biggest problem with the prototype is that the Pico can only handle 2 voice polyphony and that’s after overclocking the Pico to 290Mhz.    I have a few ideas on how to fix this.

– Optimize DEXED.   I admit I don’t understand the code well enough to try and make it run more efficiently.   It might work great on a modern core i7 but the ARM core M0 processor in the Pico even overclocked at 290Mhz cannot cope.  But DEXED looks like it already has a lot of optimizations by using trigonometric lookup tables but it does have some 64-bit math and a logarithmic math.  However, I am doubtful optimizing those bits would amount to a significant amount of additional polyphony.  

– Try to use the second core of the Pico.  Since the Pico is a dual core processor, it might be possible to double the polyphony by leveraging the second core on the device.  But even so, that would still only amount to 4 voice polyphony.  I know that writing low level multi-core code can be tricky so this might be a lot of effort for not a lot of gain. 

– Try a different microcontroller with more horsepower.   I’ve been looking into the ESP32 whose specs look like it might be sufficient to run DEXED and get 8 voice polyphony or even more.  

Portable Studio Setup

I see a lot of gear reviews and studio tours on the net, especially YouTube. Some are incredible. There are also a lot of “portable” setup showcases but it doesn’t seem to get the same treatment as the more grandiose studios. Perhaps this is just an indication that most people like to create music in grandiose studios but I typically get more inspiration when I’m in new surroundings – outside in a park
or in some foreign city sitting in hotel room. So on those occasions where some musical inspiration hits me, what are the best way to capture those ideas?

If I want to compose something orchestral, the most practical portable setup is Sibelius with NotePerformer. I am not a big fan of the Sibelius 7 sounds and find that NotePerformer gives a better performance.
This setup is not the cheapest of setups but, to me, is the best bang for the buck for portability when it comes to writing orchestral pieces. You can also use more expensive and expansive orchestral VSTs but you have to be aware of the power of your laptop and storage requirements. This setup is not the best for pop, jazz or contemporary tunes. For that, I like using a small portable keyboard with a DAW. Being a keyboard player, I have a few keyboards ranging from an 88 key weighted action beast to a small portable 37 key mini-key synth. The 37 key mini-key keyboards are not the easiest to play but are the most portable and the ideal size for travel. It fits perfectly in a carry on suitcase. 49 key keyboards are a little too big and those 25 key keyboards are too small to play full chord voicings. My keyboard of choice happens to be the Reface DX. I like that it runs on batteries and has speakers. I just wish it could be used as an audio sound card as well! The combination of the keyboard and simple DAW in a laptop is enough to capture a lot of ideas. The sound sources will be up to you, the kind of music you want to create as well as the power of your laptop. For me, Superior Drummer, Spectronsonics Trillian and Omnisphere does a lot of heavy lifting. For the audio monitoring, earbuds are fine. Remember, we just want to capture ideas, you can always fine tune the final mixdown at home. I should note is that all of my recording is MIDI based. I don’t like having to carry around an extra USB audio device, not only because it adds additional weight but takes up a crucial USB port. If your main axe is a guitar or an instrument that requires audio input, that’s something to be considered. I have a 2013 macbook air 11 inch with 8gb of memory. It has Sibelius 7, NotePerformer 3, and Cubase AI with Superior Drummer, Spectronsonics Trillian and Omnisphere and Halion Sonic SE. It’s more than enough to write sketches or capture ideas on the road. The Reface DX plugs into the laptop with a USB cable. Unfortunately, it is not USB powered, so I do carry the AC adapter. As I mentioned, before, it does run on batteries so the whole rig can be used outside in the park if that was something I wanted to do.

I think there are probably iPad or iPhone based solutions that are similar to my laptop solution but I have not done any research into that. As an aside, I have seen suggestions to use smartphones to record ideas / audio. So, if you’re outside and hear some catchy melody in your head that you want to quickly capture before it leaves your brain forever, just whip out your phone and sing your idea and verbally notate it by articulating the changes/rhythm/tempo. etc.
But for me, this isn’t very practical as I am a horrible singer and self conscious about singing into a phone.

Yamaha Montage 3 Synth Engines

Many people think of the Yamaha Montage as an FM synth and a sample based (AWM) synth.  But if you own an FM synth like the Yamaha Montage then you also own an synth with additive synthesis capabilities.

A typical waveform is the square wave.  A square wave is just all of the odd partials add 1/N amplitudes.   So, the fundamental has a relative amplitude of 1.0.  All even partials have a relative amplitude of 0 so we can skip those.  The 3rd partial has a relative amplitude of 1/3 (0.33), the 5th partial is 1/5 (0.20), the 7th partial at (1/7) 0.14, the 9th partial at (1/9) 0.11, the 11th partial at 1/11 (0.09) , the 13th at 1/13 (0.08), the 15th at 1/15 (0.07) etc.

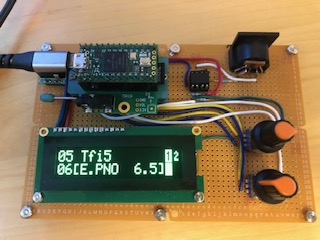
I used algorithm 1 which is all 8 operators as carriers.

Then set the relative frequency and levels as follows:

Operator Frequency Level
1 1.00 99
2 3.00 33
3 5.00 20
4 7.00 14
5 9.00 11
6 11.00 9
7 13.00 8
8 15.00 7

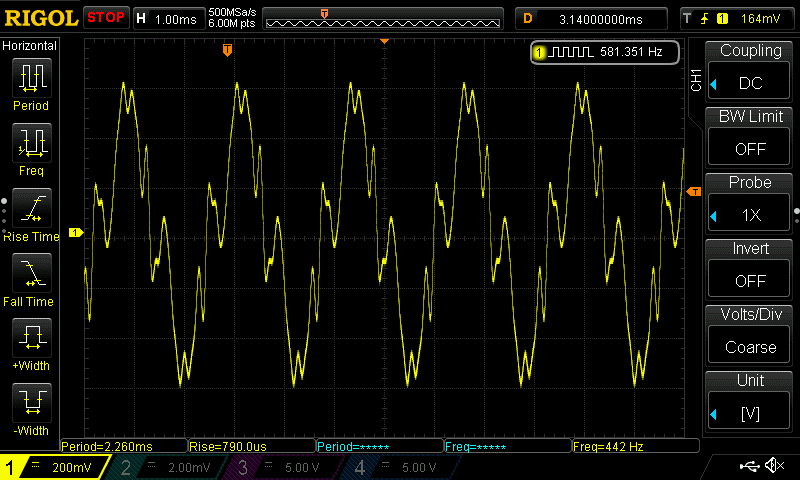
But the result sounded nothing like a square wave!  In fact, when I looked at the output, it looked like this:

Which you can see is just a simple sine wave!

It turns out that the operator levels are not linear but exponential.  Here are the relative measurements I measured the AC voltage of the single operator output at 440Hz and normalized the results.

Op Lvl Normalized Magnitude
99 100.000
98 92.000
97 84.400
96 77.300
95 70.900
94 65.290
93 59.880
92 54.920
91 50.360
90 46.190
89 42.360
88 38.840
87 35.610
86 32.650
85 29.940
84 27.460
83 25.180
82 23.080
81 21.150
80 19.400
79 17.790
78 16.310
77 14.950
76 13.710
75 12.560
74 11.520
73 10.560
72 9.670
71 8.860
70 8.130
69 7.450
68 6.820
67 6.250
66 5.730
65 5.250
64 4.810
63 4.400
62 4.040
61 3.700
60 3.390
59 3.100
58 2.840
57 2.600
56 2.380
55 2.180
54 2.000
53 1.830
52 1.670
51 1.530
50 1.400
49 1.280
48 1.180
47 1.070
46 0.980
45 0.900
44 0.820
43 0.750
42 0.690
41 0.630
40 0.570
39 0.520
38 0.480
37 0.430
36 0.390
35 0.360
34 0.330
33 0.300
32 0.270
31 0.250
30 0.220
29 0.200
28 0.180
27 0.170
26 0.150
25 0.140
24 0.120
23 0.110
22 0.100
21 0.090
20 0.080
19 0.060
18 0.050
17 0.040
16 0.030
15 0.030
14 0.030
13 0.020
12 0.020
11 0.020
10 0.020
9 0.010
8 0.010
7 0.010
6 0.010
5 0.010
4 0.010
3 0.010
2 0.010
1 0.010
0 0.000

At operator level 9 and lower, my DMM could not read any voltage so I just assumed it was a normalized level of about 0.01.  Now resetting the operator levels to the normalized values as follows:

Operator Frequency Level
1 1.00 99
2 3.00 86
3 5.00 80
4 7.00 76
5 9.00 74
6 11.00 71
7 13.00 69
8 15.00 68

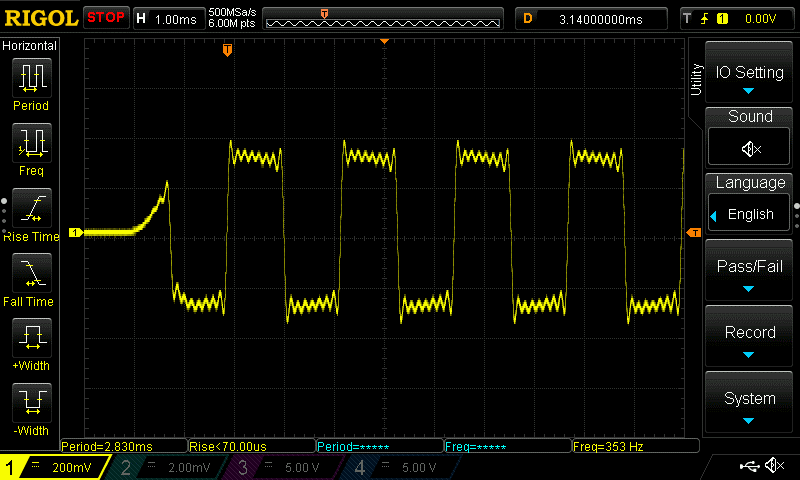
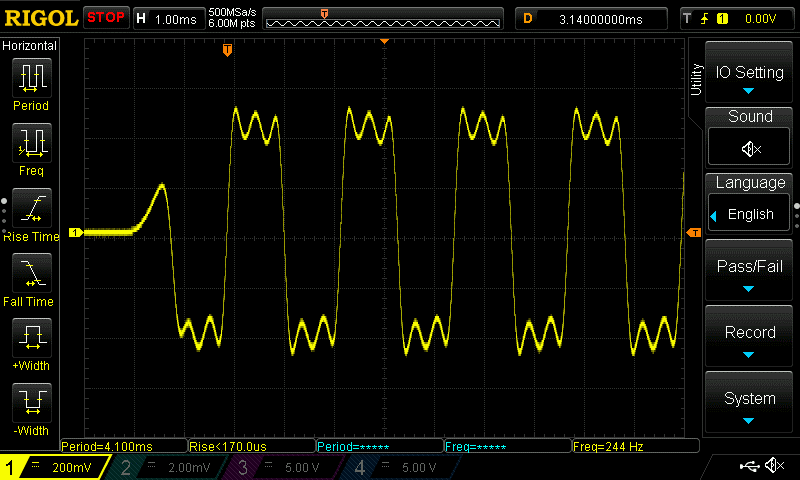
Then I got something that looked like

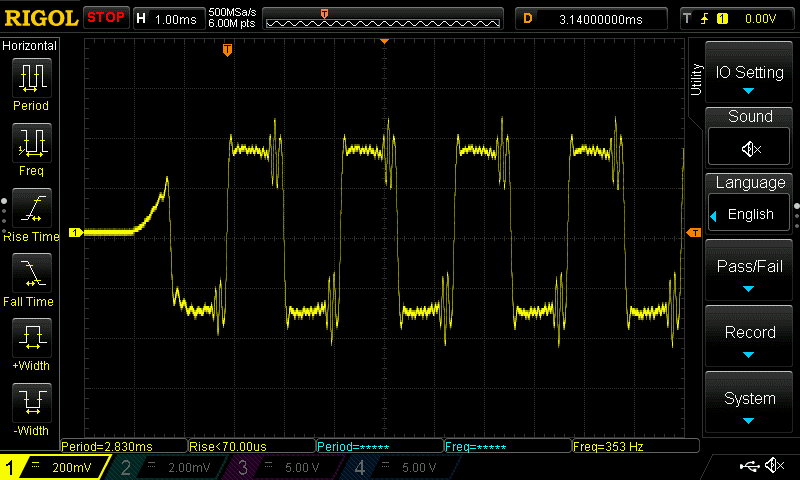
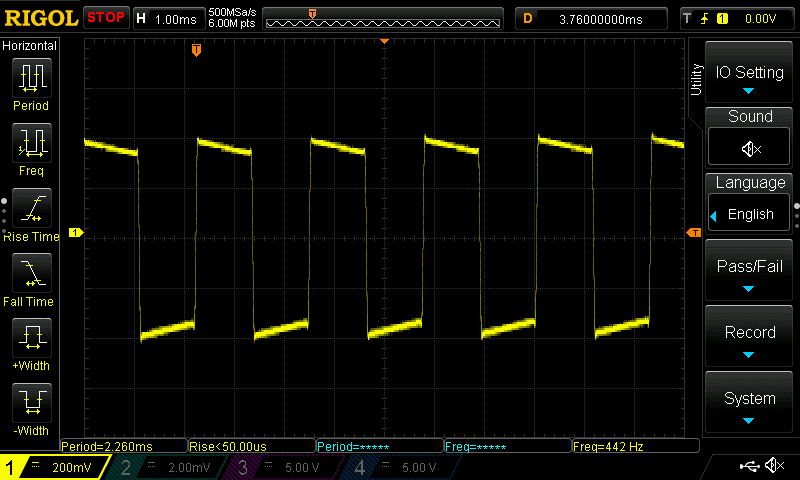
But that’s not a square wave – but it sounded like a square wave.  The scope output looked like the operators were not in phase.  After some investigation, I found that the operator frequencies drift.  I was playing A440 on the keyboard and the Montage is tuned to 440.0Hz.  I measured the frequency of a single sine wave on a DMM and found that the frequency would drift between 438Hz and 442Hz.  I also confirmed there is no pitch modulation on the operator.  I don’t know if this is intentional or an idiosyncrasy of the Montage OS version I am using which is version 3.50.0.  When I reset the oscilloscope to trigger at the beginning of the sound, it looked like

This looks very much like a square wave comprised of the first 8 partials.  So we can safely assume that the operators are in sync in the beginning but drifts over time.

The Montage can generate up to 31 partials, so let’s try that.   This can be accomplished with a performance with 2 FMX parts.

FMX Part 1

Operator Frequency Level
1 1.00 99
2 3.00 86
3 5.00 80
4 7.00 76
5 9.00 74
6 11.00 71
7 13.00 69
8 15.00 68

FMX Part 2

Operator Frequency Level
1 17.00 66
2 19.00 65
3 21.00 64
4 23.00 63
5 25.00 62
6 27.00 61
7 29.00 60
8 31.00 59

Here is what it looks like

Is it a true square wave? No.  It has some very some “ringing” in wave which I cannot explain.  But when I compare it to the sampled square wave form (see below), it sounded the same to my ears.  I can’t hear much over 12kHz so it might sound different to you.

We also know that FM synthesis can generate a “square” wave with 2 operators stacked with a 2:1 Carrier/Modulator frequency ratio. 

Using any algorithm that has a 2 operator stack we can get square waves with varying degrees of “squareness”.  It’s not really a true square wave but get’s pretty close.  Here is the output of the waveform with various modulator operator output levels.

Modulator Output level is 67

Modulator Output Level 72

Modulator Output Level 75

They look like square waves and sound like square waves but is not as bright as the squarewave generated with the additive synthesis.

The Montage has an AWM (sample based) synth engine also. If we look at the Synth waveforms, there is a square wave sample (#2136) called P50-1 which is a square wave with a 50% duty cycle and looks like.

You can see it has the sharp pointy edges as you’d expect in a square wave but it had a bit of slope on the tops and bottoms which frankly surprised me.  Regardless, it sounded the same as the square wave created with additive synthesis.

So, the Montage has 3 unique ways to generate waveforms like a square wave.  Of course, the Montage has filters, effects, and a myriad of modulation sources which can be used to modulate these waveforms.