Yamaha DX7 Clone on Teensy 4.0

More Polyphony, slightly better sound.


I ported DEXED to both the ESP32 processor and TEENSY4.0 MCU + Audio Shield. Pictured is the Teensy4.0 + audio shield and a 128×32 OLED display to display the patch name.

With the Teensy4.0 I have been able to confirm at least 10 voice polyphony! However, there is a slight “glitchiness” to the sound which is more pronounced depending on the patch.  You can really hear it in the YouTube video, especially the E.Organ1 patch! I think it is mostly software based because it is virtually non-existent on some of the other patches.  


What about the ESP32?

I couldn’t get the ESP32 board to quite work but the problems can be overcome.  One issue is that the ESP32 software development environment is built around a RTOS. It does not appear that one can develop an application in a “bare metal” or near “bare metal” mode like the Raspberry Pi Pico. As a side note, the Raspberry Pi Pico supports both a “bare metal” environment as well as a Arduino centric library.  The ESP32 RTOS assumes your process will yield to a watchdog process and this yielding and task switching will take approximately 10 milliseconds. Well, 10 milliseconds in real-time audio is forever and causes big glitches in the sound generation. I was able to get around that by using a suggestion in some forums to set the task priority to the taskIDLE priority

xTaskCreate(someFunction, “HumanReadableNameofTask”, 4096, NULL, tskIDLE_PRIORITY, NULL)


The ESP32 restriction of working in the confines of an RTOS was an unexpected hurdle in porting DEXED.  But ultimately I couldn’t get DEXED to run on the ESP32 because the DAC I have doesn’t work well with the DMA of the ESP32. I’ll have to look into a different DAC to fix that.  That will be a separate project.  

As an aside,  the Teensy audio library only works in the Arduino environment.  The Pi Pico can work either in a “bare metal” environment mode or Arduino environment. The ESP32 only works within its RTOS environment.


Cost

When I first worked on getting DEXED to run on the Pico Pi, my objective was to try and get a really cheap DX7 clone running.  Since the Pico Pi is only a $5 MCU, just adding a cheap DAC seemed like I could get a DX7 clone for under $10.  But I could ultimately on get 2 voice polyphony out of it.  I pursued the ESP32 MCU as it is only about a $8 MCU but, as I mentioned, I couldn’t quite get it to work.  Which brings me to the TEENSY4.0 board.  This board list for $20 USD but since I don’t live in the US, it ends up costing me more around $25 locally.  But for that amount of money, getting 10 voice polyphony out of the Teensy makes sense. The processor is board is 5 times cost of the Pico Pi which could only generate 2 voice polyphony so getting 5x polyphony would be expected to make sense from a cost perspective.  The Teensy audio daughter board lists for about $14 and is more expensive than my home brew DAC I built for the Pico Pi but given that it just “worked out of the box” and I didn’t have to fiddle with any clocks or software to get the precise sampling rates was well worth the cost.  The Pico Pi prototype had some noise issues and given that I am convinced that the noise issues on the Teensy are likely all software based, I think it’s well worth the cost. 

But given the cost of the Teensy and daughter board, it might make more sense to just run DEXED on a raspberry pi. But then there is no fun in that as it would just likely work. There would be no porting work involved and that’s a lot of the fun! 

Raspberry Pi Pico – DX7 clone

Building the MIDI sequencer with the Raspberry Pi Pico was a great learning experience and a chance to learn the details and features of the Pico microcontroller. 

I thought it would really cool to combine the sequencer with a sound source other than my Reface DX or other MIDI synths, so I embarked on building a Pico based synthesizer.   After searching for different ideas, I found a few open source software emulations of the fabled DX7.  One in particular that caught my eye was a program called DEXED.  It is open source and written in C/C++ which made it an attractive candidate to attempt a port to the Pico.  I had no idea if the Pico would be fast enough to run the software but decided build a prototype and give it a try.

So with a minimal number of parts, the Pico Pi, a 12 bit DAC, a MIDI in circuit, a 2-digit 7segment LED and BCD driver, a active low pass filter, I built the circuit and proceeded to port DEXED to the Pico.  The point of this project was to see if Pico could run DEXED.  I wasn’t too worried about sound quality as long as it was “good enough”.   

Well, to my surprise, I was able to get it to work.  In fact, I ported the original DX7 ROM into the code and am able to confirm that it indeed sounds like the original DX7!   I guess it would be more accurate to call what I created a TF1 clone (one of the modules in the TX816), since the DX7 has a keyboard, touch panel, etc and the TX7 also has and LCD screen with some buttons.  The 7segment LED and BCD driver isn’t necessary to make the prototype function correctly but it made it easier to figure out which patch was selected.

However, the prototype isn’t without problems.  First, it’s really noisy.  It has a low pass filter, but it has a lot of noise and hum.  This has a lot to do with the cheap DAC I chose as well as the fact I used the same power source for both digital and analog power references!  Of course, this can be remedied with a better design and additional parts but my goal was just to see if the Pico could run a port of DEXED.  I figure I can work on cleaning up the audio quality later once I proved that microcontroller could run DEXED.  

But the other limitation and probably the biggest problem with the prototype is that the Pico can only handle 2 voice polyphony and that’s after overclocking the Pico to 290Mhz.    I have a few ideas on how to fix this.

– Optimize DEXED.   I admit I don’t understand the code well enough to try and make it run more efficiently.   It might work great on a modern core i7 but the ARM core M0 processor in the Pico even overclocked at 290Mhz cannot cope.  But DEXED looks like it already has a lot of optimizations by using trigonometric lookup tables but it does have some 64-bit math and a logarithmic math.  However, I am doubtful optimizing those bits would amount to a significant amount of additional polyphony.  

– Try to use the second core of the Pico.  Since the Pico is a dual core processor, it might be possible to double the polyphony by leveraging the second core on the device.  But even so, that would still only amount to 4 voice polyphony.  I know that writing low level multi-core code can be tricky so this might be a lot of effort for not a lot of gain. 

– Try a different microcontroller with more horsepower.   I’ve been looking into the ESP32 whose specs look like it might be sufficient to run DEXED and get 8 voice polyphony or even more.  

Breathing New Life into the old Yamaha Breath Controllers – Part 2

Here is the schematic for the Yamaha Breath Controller to MIDI converter.

Yamaha Breath Controller to MIDI converter

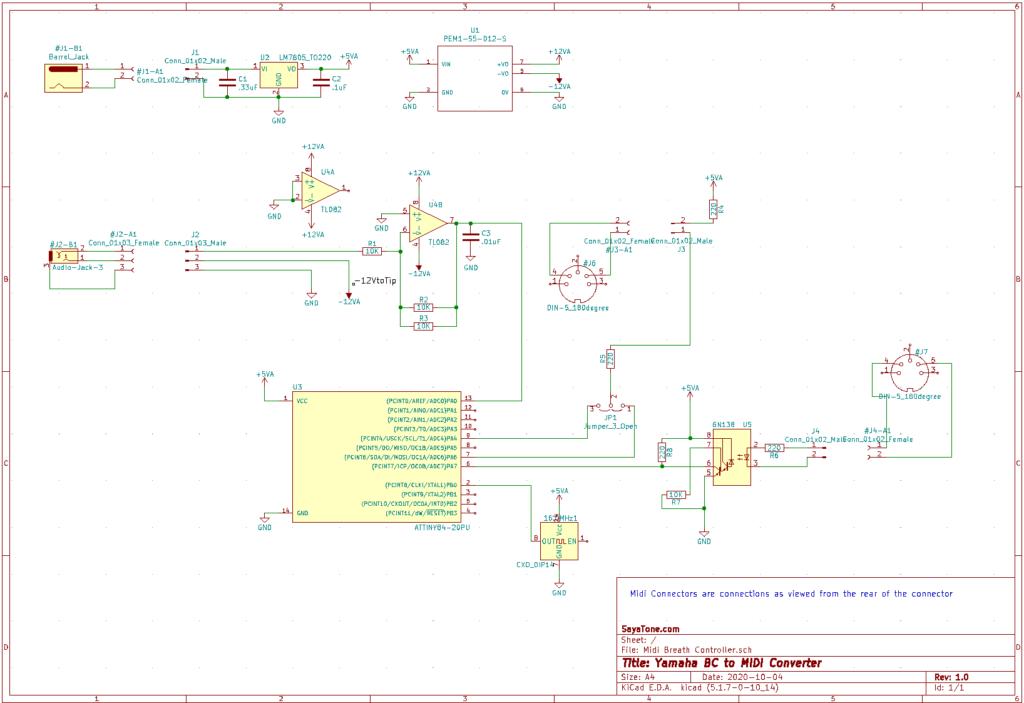
The design is simple. Starting with the power section. It is not the most efficient but is designed around parts that I had available. The main power is based on a 7805 linear voltage regulator (U2) and a external DC supply like a wall-wart. Since the 7805 requires an input supply voltage to be greater than 8V, it can be powered by a wall-wart of 9V or more. A 12V wall-wart can also be used but will generate a bit of heat. The second part of the power supply is a DC-DC converter PEME1-S5-D12-S (U1) that converts the regulated 5V supply and generates 2 additional voltage rails +/- 12V. The DC-DC converter can supply a max current of 42mA which is more than enough for the breathcontroller which draws about 12mA as well as the opamp. A USB 5V supply could be used in place of the 7805 regulator as the current requirement of the circuit is well under 500mA. I personally dislike working with the USB connectors as it’s hard to drill rectangular USB socket holes in project cases and I have a handful of wall warts and round power jacks.

The BreathController (based on Yamaha DX7 schematics) uses a negative supply voltage and returns a negative voltage between 0V and the supply based on the amount of breath pressure through the BC. Using a -12V supply, I measured the output voltages of the BC1 and BC2 that I own. The BC1 range is (-0.26V ~ -10V) and the BC2 range is (-0.14V ~ -10V) . Using a TL-082 op-amp (U4) in an inverting configuration with a gain of -0.5 results in a converted output voltage of 0.13 – 5V and 0.07 – 5 V respectively which is conveniently within the ADC voltage specs of the ATTINY microcontroller. The reason why I used 2 – 10K resistors ( R2 / R3 ) in parallel instead of a 5K resistor is because, 5K resistors are not usually available and 10K resistors are cheap and I have a bunch. Additionally, 2 – 10K resistors in parallel is closer to 5K than a nominal 4.7K resistor.

For the microcontroller, I used the ATTINY84 because that’s what I had around. The ATTINY84 has an internal clock but I had a hard time getting the MIDI output to match the exact 31.25K baud rate without using an external clock. So, again, since I had a 16mhz oscillator, that’s what I used. So when you program your ATTINY, make sure not to forget to blow the fuses correctly.

The schematic does have an MIDI input section with a 6N138 optoisolator (U5) but if you want to just convert the breath controller input to MIDI data, then you can leave out that part completely. I wanted to merge MIDI input with the breath controller MIDI output but since the Arduino serial library do not allow simultaneous read/writes, I had a lot of difficulties getting the merge to work even using some of the 3rd party serial libraries like SoftwareSerial. Also, SoftwareSerial uses the timer which means that PA4 (pin9) cannot be used for the MIDI output which is what the ATTINY serial library uses for the serial output. The Jumper (JP1) allows me to switch between the MIDI output only software which relies on the Arduino Serial library and transmits on pin 9 vs the SoftwareSerial library which I programmed to transmit on pin 6. Again, if you just need to transmit MIDI out data, you can tie the MIDI output directly to pin 9 and forgo the jumper. I did not put a 5V buffer between the microcontroller output and MIDI connector as I found the ATTINY had enough current to drive the current loop.

The software is very simple for the BC -> MIDI out conversion. As I mentioned, getting the MIDI IN merge was tricky and is not without bugs. I won’t post it until it gets a bit more stable.

So the code below is strictly to deal with breath controller to MIDI conversion only. The ADC on the ATTINY is a 10 bit converter (0-1023) so to convert it to an 8 bit value (0-255), which is needed by MIDI, I divided by 8. Be warned, this code may flood your MIDI stream with data especially with a clock as high as 16mhz. I added a comparison of the previous value so the microcontroller would only send a message if there was a change in BC voltage. It helps but this software tends to send quite a bit of MIDI data.

void setup() {
  Serial.begin( 31250, SERIAL_8N1 );  // this uses pin 9 to write
}

void loop() {
  int val = analogRead(0) / 8;   // read pin 13 on ATTINY
  int val2 = 0;
  while ( 1 ) {
    val2 = analogRead(0) / 8 ;
    if ( val2 != val ) {
      Serial.write(0xB0);   // continuous controller 
      Serial.write(0x02);   // breath controller
      Serial.write(val2);
      val = val2;
    }
  }
}